
I think everyone these days ends up with a good broadband provider (like ACT in Bangalore) and have a decent high speed router too (> 100 Mbps support). But the range is always an issue. We have amazing coverage in our hall but as you move towards the bedrooms the signal drops to 1 point and sometimes none (this is the case with 2.4 GHz, the 5 GHz is short range and does not cross the hall). For a long time I was thinking of getting a wireless repeater but technically it can slow down the overall speed as it uses the same band for communicating between your actual router to the machine that is connected to the repeater.
The power network adapters have not taken the market yet by storm, so for now the best option that I could think of was using some old routers to extend the network. I managed to run ethernet cables from the LAN ports of my main router to 2 of my 3 bedrooms that are the farthest. What was remaining was to setup the routers.
I have provided the steps as 2 options. First option is for the advanced users. Second option is in detail and is meant for someone like me who did struggle a bit before gettings things to work.
OPTION 1: Simple Steps (for Advanced users 🙂 )
- Note down the MAIN router’s IP address, its subnet mask, WiFi SSID, security mode, channel and WiFi password
- Configure the SLAVE router’s IP address in the same subnet as main router’s, disable its DHCP and NAT, mimic the WiFi SSID, security, channel and password to match the MAIN router’s and you are done
OPTION 2: In Details Steps for Novice users
- NOTING DETAILS FROM MAIN ROUTER:
- My main router was a tp-link and behind it there is the IP address printed on it along with username and password. The IP address was 192.168.0.1 and username and password were both admin
- I was connected to this router by ethernet cable and opened chrome and gave http:// 192.168.0.1 and provided the username and password and logged in. If there is any tab that says “Advanced” click it
- There was a section called “Internet” which had details of my ACT username and passsword. Ignore this. We should not disturb this. It could be called as WAN in some routers.
- Look for section called LAN. Confirm that the IP address is same as above. In my case it was 192.168.0.1. Note the subnet mask. It was 255.255.255.0
- Next move to section called “Wireless”. Note down the following
- WiFi SSID – this is the WiFi name that you use to connect
- WiFi Security – For me it was WPA/WPA2
- Channel – It it says auto you choose a number, say 4
- WiFi Password – Same that you use during connect
- SETTING UP SLAVE ROUTER – PART 1 <LAN>
- Power it on and Reset the Slave router. For my Dlink, there was a small reset button that I had to keep pushing for some time. It is always a good idea to start from this resetting as we don’t know what it was used for earlier and the old settings might create problems
- For this operation, disable WiFi on your laptop and use an ethernet cable to attach your laptop to the slave router.
- Behind the slave router you will find default IP address and username/password details. For me it was 192.168.0.1 and Admin was username and password was empty.
- Go to browser again and type http://<slave-router-ip. For me it was http:// 192.168.0.1. I logged in with the credentials.
- We are not bothered about setting up Internet details on the slave router (only Main router will be used to connect to Internet service provider like ACT). So we will not enter anything in section like “Internet” or “WAN”. Just leave them to whatever details they have. If the router is forcing you to select something, just choose anything here it does not matter
- Go to section called “LAN”. It could be also called as “Local Network” in some routers. Do the following
- In IP address enter the next number after your MAIN router’s IP address. For me I entered 192.168.0.2 (My Main router’s IP address was 192.168.0.1.Actually the last number can be anything but what I am trying to do is name them in order like if 192.168.0.1 is MAIN then 2nd is 192.168.0.2 and I setup a third router also at my home where I set the IP Address of the router as 192.168.0.3. Your default IP address of Slave router does not matter.
- Enter subnet mask same as what you saw in Main router subnet mask. For me it was 255.255.255.0
- The moment you hit ‘Save’ or ‘Apply Changes’, it will seem to have stopped working. This is because now, your Slave router has moved to the new IP address that you gave (for me it was 192.168.0.2) and so you have to enter that in browser like http:// followed by 192.168.0.2 and use the same credentials as before. Sometimes you might have to restart your PC (basically remove any cache in browser) for this to work.
- Find for the DHCP and disable it. It will be mostly under LAN or ‘Local Network’. You have to select ‘Disable DHCP server’ or if there is a dropdown select “None” for DHCP
- Find NAT and ensure that there are no entries. If it is not there, don’t worry about it. If there is a ‘Gateway’ instead, disable that. If not, fine
- PHYSICAL CONNECTION
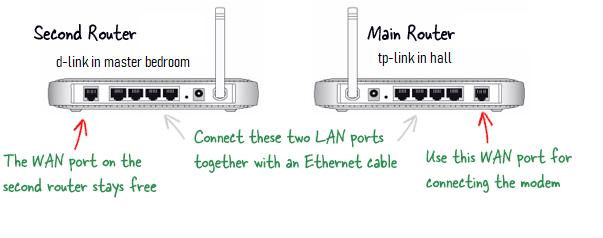
- Now run an ethernet cable from one of the main router’s LAN port to a LAN port in slave router (LAN not WAN). I got a long bluerigger high quality ethernet cable and ran it through my data only pipe at home (try not to run it along with power cables). You can run it outside on the walls too. Refer the image below courtesy Amit Agarwal from labnol.org
- At this point, you can test if the interet is working on your laptop connected to the slave router. It should work. Not only that both your routers should be accessible now using their IP addresses (my case 192.168.0.1 and 192.168.0.2)
- SETTING UP SLAVE ROUTER – PART 2 <WiFi>
- Login to your slave router using its IP address (that you gave. I gave 192.168.0.2).
- Go to ‘Wireless’ section. If there is advanced option click it
- You can decide to use this as a separate SSID (separate WiFi name) compared to your main router’s WiFi name
- In my case I wanted them to give the same name. Advantage is that your devices will switch automatically from one router to another as you move around your house, like in a hotel or office. Disadvantage is that you won’t know which router you are connected to (Why do you want to know anyway?)
- If you want to use same name like me that you have to do the following
- In SSID give identical SSID that you noted down from Main router
- In Security, select the same type of security as the main router setting. I put this as WPA/WPA2
- Select the same channel as main router. For me I put it as 4
- Select the same password also
- Click ‘Save’ or ‘Apply Changes’ and you are done.
- SETTING UP A THIRD ROUTER
- In fact I setup a third router also (a good way to use the old routers as you move from service providers or upgrade to better ones)
- For the third router, I used a tenda. I reset it and used its IP address written on back 192.168.1.1 and admin/admin as login. I changed its LAN to 192.168.0.3. For some reason it ran into issues when I did this and I had to reset and use it default WiFi to connect instead of LAN ethernet. I used an iPad this time (laptop was being used) and it went through this time. No idea why
- After subnet and WiFi details it worked flawlessly.
- My challenge was in running another ethernet from my main router to this bedroom too.
Overall this was good fun. Sometimes frustrating but as good computer engineers, you stick to it till the end, bear the snide comments from family members and their sarcastic looks when things don’t work, knowing that they still love you a lot and you should be through 🙂